How To Correct Videos in Lightroom
Did you know you can use Lightroom for more than photo editing? You can also do some very basic video corrections. If you haven't used it for this, then we suggest you give it a try. If you're already familiar with other Lightroom features, you'll find it easy to use for video corrections as well.
If you need to do more advanced video editing, you'll have to use another program. Lightroom offers basic options for most common video files.
Import Your Videos:
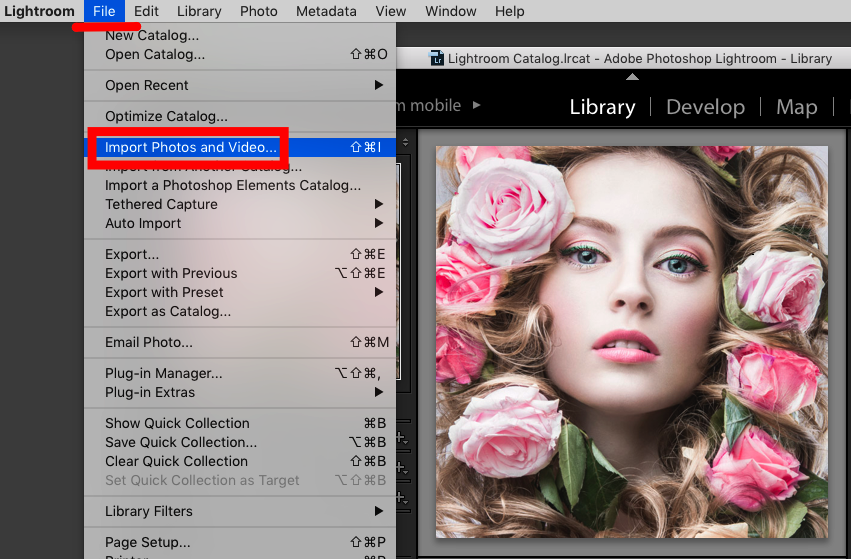
Just like with photos, you'll need to import your video files to work on them. The process is somewhat similar to photo importing. Click on Import Photos & Video menu under File. Browse to find your video and import. Lightroom will show you thumbnails of any compatible video files. At this point, you can use any of the typical Lightroom options for importing: Add, Move, or Copy the original files.
Filter a Video List:
You can filter out videos from photos to show only videos in a list and make it easier for you to browse through them. To do this, you'll need to be in Library module, select View and then Show Filter Bar or press backslash. This opens the filter box. You can click on Date and File Type. Select Video and you'll note that now you're able to view your video files without the added clutter of photo files in the catalog.
Corrections in Quick Develop:
Just as you can use the Develop module to adjust your photo images, you can use it to adjust your videos. It a fairly similar process but with fewer options, unfortunately. Also, keep in mind that you can't open videos in the Develop module. You'll need to do it in the Quick Develop panel of the Library module. Once on the panel, you can adjust the clarity, exposure, and vibrancy using your arrows. It's not terribly complicated.
Advanced Corrections with Presets:
Yes, you can use Lightroom Presets in a video in much the same way you would an image. What you'll need to do is pull a still image from the video and pull it into the Develop module. Create a Preset based on your adjustments then you can apply that Preset to your entire video.
Here are the settings available for video files in Lightroom:
- Basic tone settings, including exposure, contrast, whites, blacks, saturation, vibrancy
- White balance
- Tone curve & Split Toning
- Color
- Export
More on Exporting:
You can export your corrected video by right-clicking on it within the filmstrip and selecting Export. It's very similar to exporting a photo but with some limitations and one unique feature. You can also select a file location and renaming options. One nifty feature is the ability to set the video's resolution when you export it. This allows for some flexibility and allows you to tailor the video for some specific needs. All video will export as an MP4 file, but you can set the size during its export from these following size options:
- Max: preserves original resolution
- High: the same resolution as max, but slower rate
- Medium: good for web share at 1280 x 720
- Low: good for quick sharing on slower devices, 480 x 270
Lightroom isn't a full editing program for videos, but if you are already having good working knowledge of it and need to make some basic corrections to a video, you might as well give it a try. It's a good place to get started on minor video corrections needed.


