Top 10 Lightroom Secrets You Should Know
If you use Photoshop to post-process photos, then you most probably know that the same task can be solved in different ways. Photoshop offers so many solutions to achieve the same result that photographers can choose different tools, and it's difficult to say, which is the “right” one.
Often Lightroom is referred to as an “alternative Photoshop”. As well as in Photoshop, different tools in Lightroom can be used to achieve the same aim. And the obvious and evident way is not always the best.
The aim of the article is to tell about several secrets of Lightroom and introduce to you the alternative, but quite convenient ways that will help to solve everyday tasks relating photo post-processing.
1. Use Luminance instead of Saturation
It often seems that it's quite easy to take a beautiful shot with a bright blue sky on a sunny day. However, if you shoot objects that are placed on the ground, especially in the shadow, you can get a shot with the overexposed or dim sky.
While post-processing a photo in Lightroom, usually we just want to increase the saturation using the Saturation tool, but it's not always the best decision.
Saturation slider increases the saturation of all colours at the same time, what can be destructive if you just want to enhance the saturation of the sky only.
Using this slider, you can get other problems, because you will increase saturation also there where you don't need it, for example on the skin of a model.
The alternative variant is to use «HSL / Color / B&W» panel.
On this panel, you will see the following tabs Hue, Saturation, and Luminance. Using Saturation tab, you can increase the saturation of separate colors that are related to the sky, without affecting other colors. But again, using Saturation may not give the best result, the colors will become too cartoonish, if you try too hard.
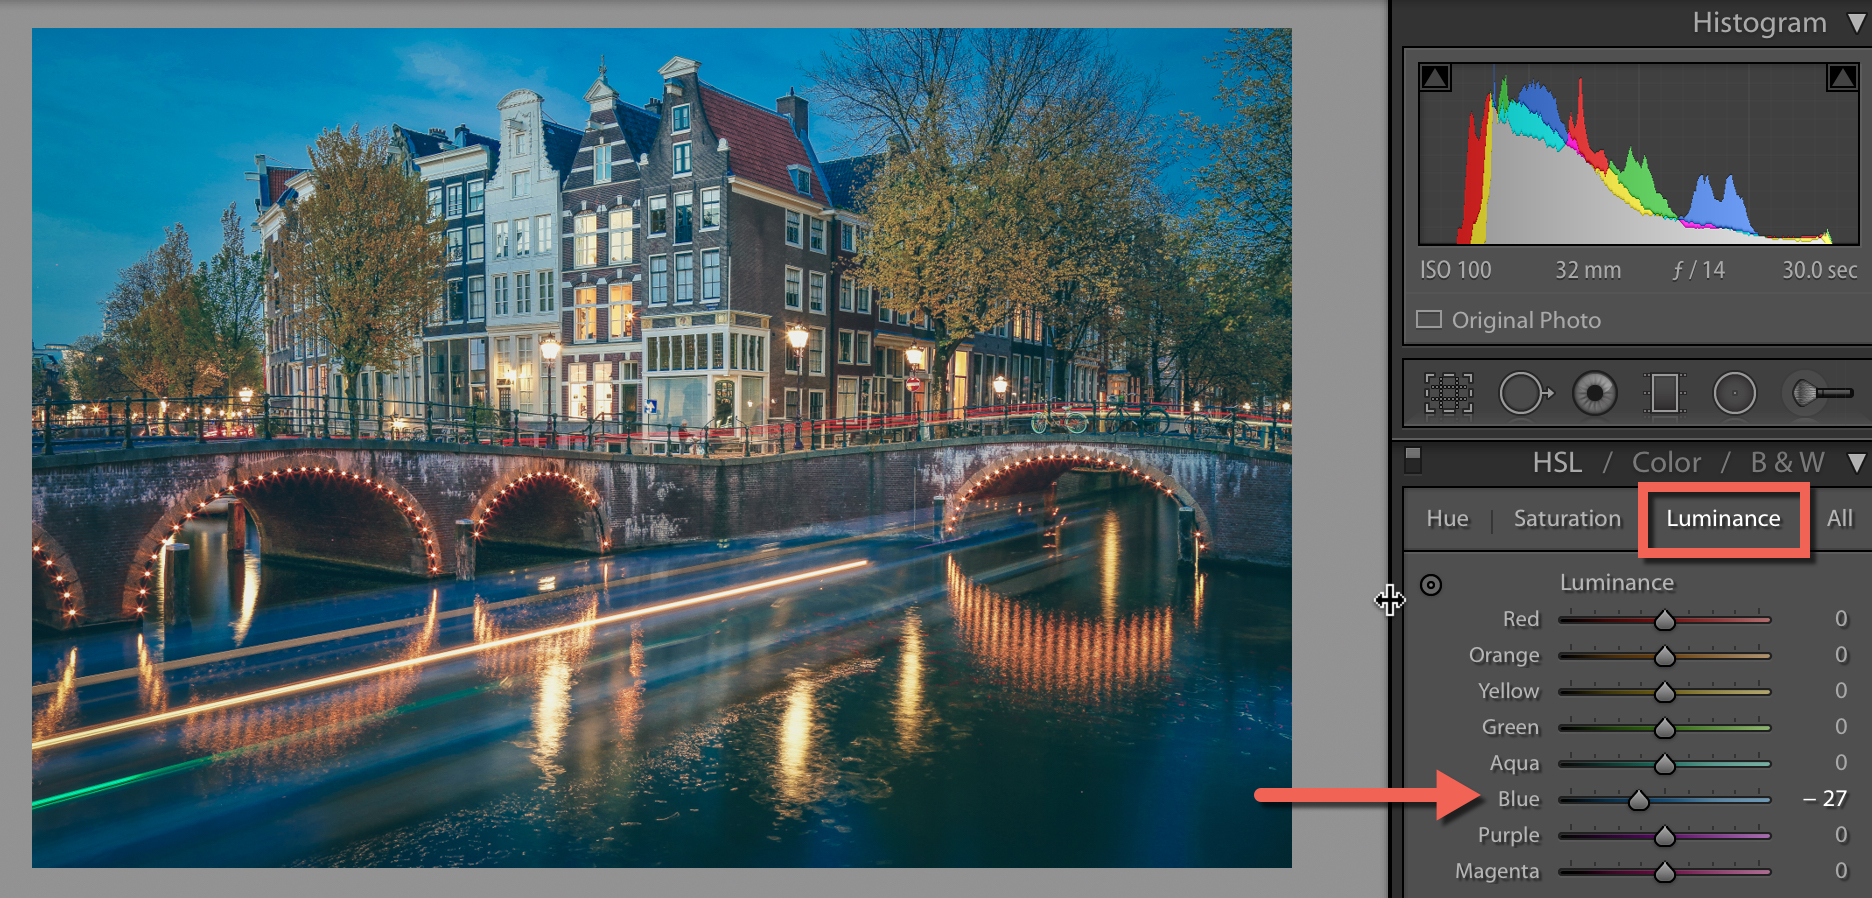
As a good alternative, you can use tabulator Luminance instead. You will change not saturation, but a brightness of a colour. Use a blue slider in Luminance tab and you will get a beautiful deep color of the sky, not affecting other colors.
2. Combine adjustment brushes
Adjustment Brush is a great tool when you want to change only the separate part of the image. One of the great advantages of the brush is that it doesn't affect the picture directly. You can modify the parameters of changes in the area at any moment, if you don't like something or just delete it.
Even if several brushes were used, you could combine parameters to achieve the best result. For example, to blur some particular area, you can assign the value Sharpness for a brush - 100. And as this adjustment provides not very strong blur, use “blur” brush for the same area several times to achieve the desired result.
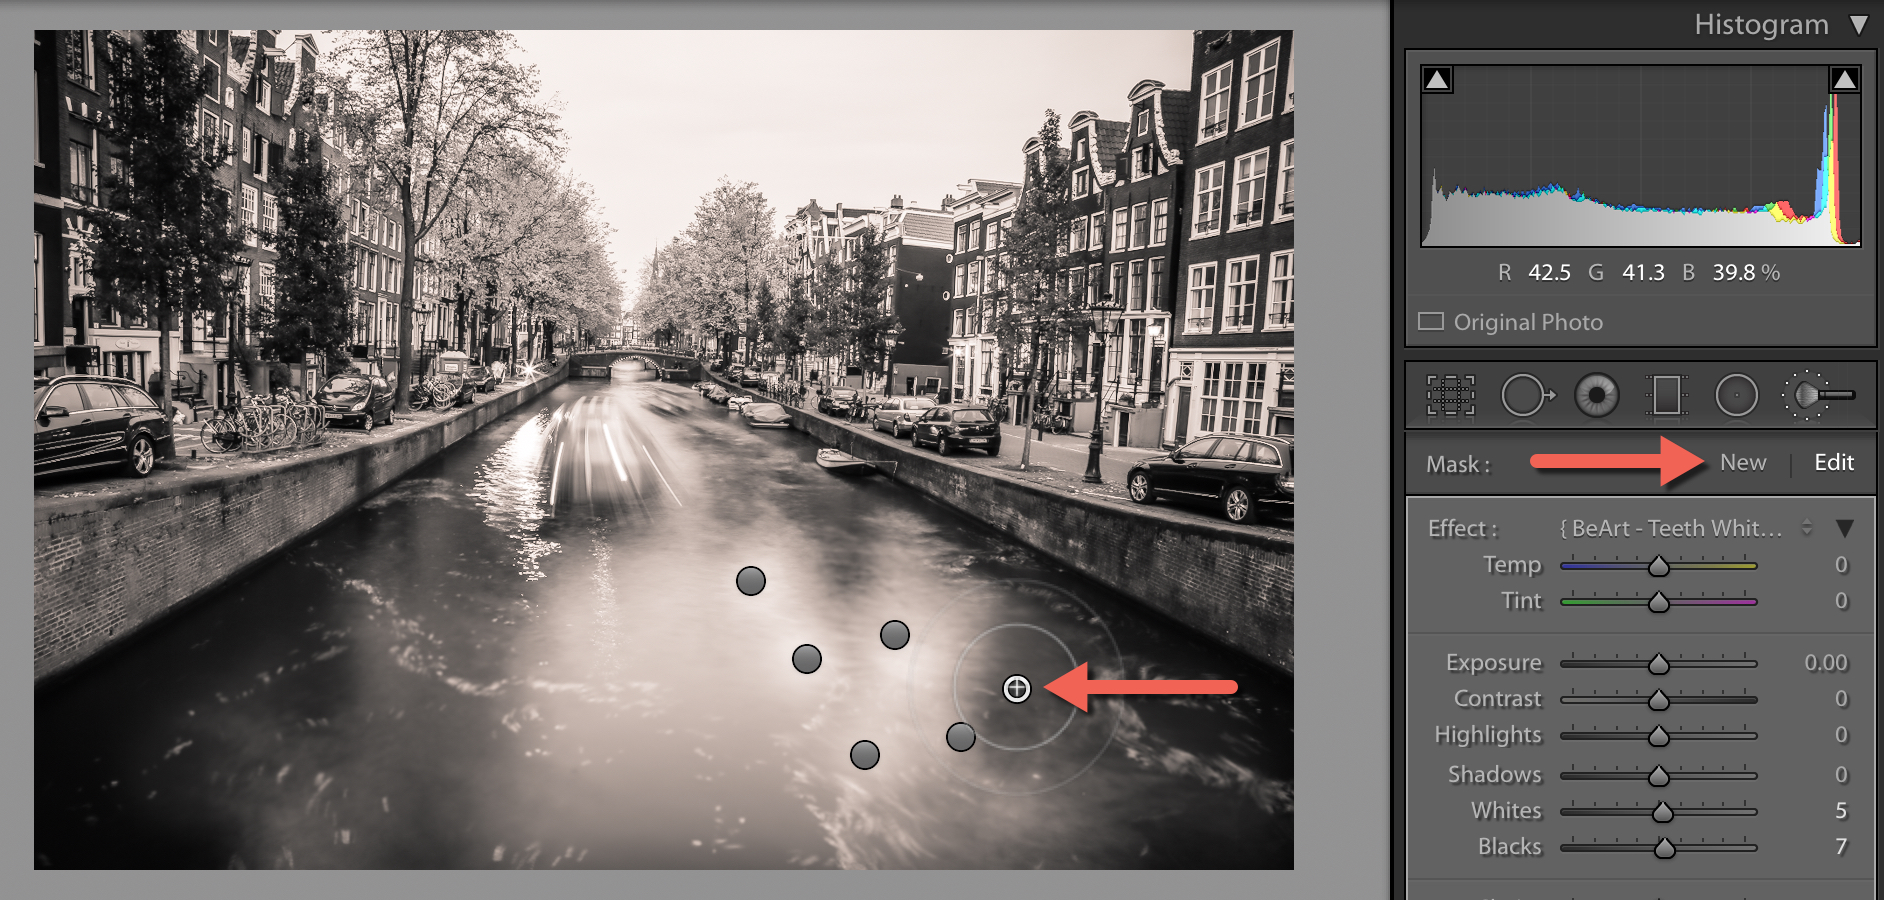
To enhance the brush effect, after you have used it, press the button New. This will create a duplicate of the brush with the same settings, and you will be able to use it on the top the first. Repeat the action as many times as required.
Don't forget that these will be separate brushes. At any moment, you can use one of them again and change settings, for example, by reducing Sharpness value.
Each brush looks like a circle on the image. Hovering a cursor over it, you will see an active area of the brush. To select a required one – click on it and in the center of the circle you will see a black dot. Now you can change the settings of the chosen brush.
3. Quick retouch of the skin on a portrait
Many factors affect the view of skin on the photo. For example, the skin can look too red or not very smooth. To fix it, you can use several techniques. You can use them together or separately. But don't overdo.
First of all, you should change brightness. Especially if the skin is reddish or too dark. Increase the brightness slightly; this will make the tint of the skin more natural. The additional bonus is that by increasing the brightness wrinkles and pores will be not so visible.
Then you should use the tabulator Luminance again. Try to increase Luminance value for red and orange colors. This will make the skin brighter, and it will have a more healthy tint.
The alternative way it's using Portrait Retouching Lightroom Presets and Adjustment Lightroom Brushes
In order to make it even easier, there is a small secret. Notice that on the left of the Luminance name there is a small circle. Click on it, then need to move the cursor to the area that you want to change. Lightroom will be automatically detecting colors under the cursor. To change them, you just need to move the cursor up or down, holding the left mouse button. This secret can be used in all three tabs Hue, Saturation, and Luminance.
Also in Lightroom, there is an incredible tool, which ideally suit for portrait retouching – the brush «Soften Skin». If you «paint» on the face of the model with the brush, then sharpness will be locally reduced due to Clarity and Sharpness parameters.
You can assign other parameters, if you decide, that those that are set by default are not appropriate for this case.
Finally, there is one more way to make skin look good. Go to Noise Reduction tab that is responsible for noise reduction.
Noise reduction also leads to some blur, which can make a portrait better. But be careful. Noise reduction will affect the whole image, not its separate parts. That is why you can spoil the whole picture.
4. CHANGING THE GRID WHEN CROPPING
Cropping tool in Lightroom has hidden opportunities that can help to improve the composition. Initially, the grid divides a shot into nine parts according to the rule of thirds. However, there are six variants of the grid in Lightroom, that you can use while cropping.
To view another variant - just press the button “O”. When pressing the "Shift-O" combination – the grid will flop over in a mirror-like way.
Also, you can see all the possible grids, choosing Tools > Crop Guide Overlay.
5. Split toning for retro photo effect
Split-toning — is a quite a popular way to create various effects. Especially to create“vintage” or retro effects. These effects are widely used in Instagram and many other online editors; that provide an opportunity to achieve various effects by “pressing the 1 button”.
If you used the presets to create retro effects earlier, pay attention to the settings that are assigned for the Split Toning tab. You may probably notice that they have the same structure, especially if you look at the Hue values for shadows and highlights.
In Highlights, the slider is moved to the left from the center and in Shadows to the right. Such position almost always gives rather interesting effect.
Try to set Hue in the same position and then try to change Saturation and Balance. However, the result will significantly depend on your image, precisely on the picture and priority colors. That's why Split-toning is a rather creative tool and it's difficult to give some ready-made pieces of advice.
If you are too lazy to investigate all aspects of Split toning, then when creating retro effects you can use presets.
6. Decreasing the influence of the preset in Lightroom
In any way, all of us use the presets in Lightroom. It's nice to get something special by just In any way, all of us use the presets in Lightroom. It's nice to get something special by just clicking the button. However, rather frequently the usage of the preset gives a too hard effect. For example, the colors could become extremely bright, what is not always good.
In such cases we would like to decrease the effect of the preset slightly; however, Lightroom doesn't offer a tool for such manipulations.
There are some methods, but they are not comfortable. You can manually track the tabs, to find which parameters have been changed and decrease the effect of each of them.
The second way is to use Photoshop. You should take the original image and on the top of it create an additional layer with the changes made with the help of the preset and then change the opacity of this layer, to achieve the effect you want.
However, there is a third way. Jarno Heikkinen created an excellent plug-in for Lightroom, which you can download from his websiteKnobroom.com. The Plug-in is called «The Fader» and it decreases the effect of the preset.
After you download and install a plug-in, open a photo and go to the tab File > Plug-In Extras > The Fader. Will appear a window where you can choose a preset and the degree of its influence on the image.
7. Information about a shot
While being in the module Develop press < I > on the keyboard and in the upper left angle of the image, you will see the information about the picture. If you press "I" again, the information will change. It's rather useful when you need to get the information about the source image or general Exif data fast.
Moreover, you can customize the information you want to see in this mode via the menu View > View Options. And then in the appeared dialog Library View Options open the Loupe View tab and select the data that you need more often.
8. Lights Out
It is well-known, but rarely used tool of Lightroom, which nevertheless may be quite useful.
When you want to draw attention to some particular area, use the Lights Out function. For example, if you select specific images from the series. Lights Out will darken all other images apart from the selected.
If you press L again, the background, except for our selected thumbnails, will become completely black.
This mode is also available in the Develop module. It is useful when you need to estimate the image more accurately without being distracted by the details of the interface and other disturbing elements.
9. SOLO MODE
There is another rather interesting mode in Lightroom, it's Solo.
Although in general, the Lightroom interface is very convenient and well thought out, due to a large number of settings and tools it can be difficult to find what is required promptly. You can spend a lot of time scrolling through panels and constantly opening and closing them.
Particularly for that, the developers of Lightroom implemented the Solo mode or the mode of the "one tab." It acts quite simple - each time you open some toolbar - all others will be hidden automatically. This significantly increases the performance of the program.
You do not believe? Just try it. For sure, soon you won't be able to imagine your life without this mode.
To activate the mode, right-click the title bar of any panel and activate Solo Mode in the appeared menu.
10. Useful hotkeys
(The key combos are for PC and are different on a Mac)
- Automatic switching with Caps Lock. If you press CapsLock, then when assigning the image some color marker, flag or ranking, you will automatically move to the next shot. This is extremely useful when you make the initial selection of images.
- Variants of Library view. Clicking on G shows the thumbnails in the "grid" mode. E - expands the selected photo. C - a compare mode, and D — switches the selected picture to the Develop module.
- Fast hide of the panels. The keys F5-F9 quickly open and hide the main 4 panels of the Lightroom interface - top, bottom, right and left.
- Alternative mode. Pressing the Alt key will switch some tools to the alternate mode.
- Reset Sliders. When double-clicking any slider, you reset its value to default. Or when pressing the Alt key, you will see a pseudo Reset button — clicking which will do the same.
- Align horizontally and vertically. In framing mode press the Ctrl key and hold it, drag a line with using the mouse, which must be strictly horizontal or vertical. Lightroom will automatically turn the picture in the proper way. It's incredibly convenient for example to align the horizon.
- Hide all panels. Ctrl + click on the title bar of any panel in Develop mode will hide all panels.
- View all keyboard shortcuts. Press Ctrl + / and you will see all the available shortcuts of the chosen module in Lightroom
We would absolutely love for you to follow us on FACEBOOK and be a part of our community. Don't forget to Share your photos with us using hashtag #BeArtPresets.


