Three ways to straighten your picture in Lightroom
It's far too easy - and common - to take a crooked picture. It can happen to the most experienced photographers.

It's a frustrating revelation when you check a photo later to find it's not straight! An otherwise excellent image can be ruined - unless you know how to straighten it in post-processing. By the way, if you want a guarantee that a photo doesn't turn out crooked, use a tripod and a level.
Luckily, it's relatively easy to straighten an image in Lightroom. Here are three ways:
1. Auto-Straighten
You can utilize Lightroom's auto-straighten, which is quick and handy. You can try this option first.
Open the Crop and Straighten toolbox with the keyboard shortcut (R).
Then click "Auto." Lightroom uses the lines in the image to straighten the image.
Typically, this straightens out the image, and you're good to go. Sometimes Lightroom can't accurately detect the lines in the image. If that happens, it might not be able to correctly adjust the picture. If this happens, we suggest you try the next option.
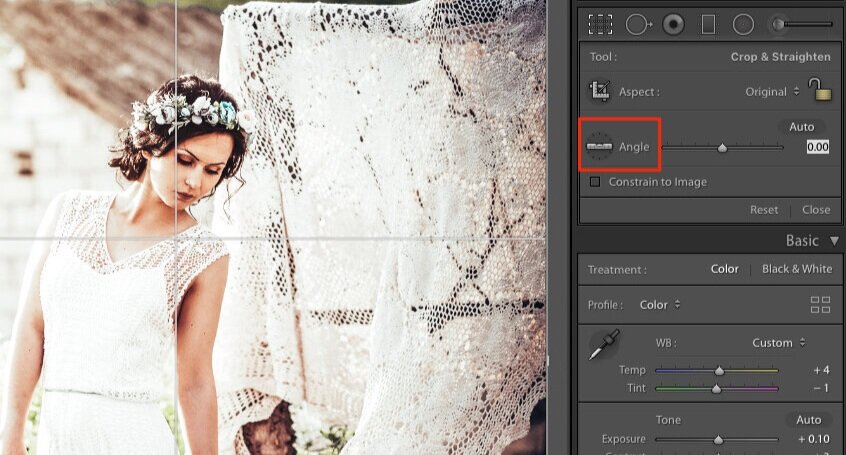
2. Angle Tool
The angle tool would be your next option if auto-straighten didn't work. With this tool, you select a straight point in the image and then drag it across the horizontal line to straighten the picture. However, this method might not work if you don't have several horizontal lines to work with. Here's the process:
Open the Crop & Straighten toolbox by using the keyboard shortcut (R).
Select the angle tool and a point on a horizontal line.
Drag the tool across a straight horizontal line, then release.
If the line you selected was horizontal, the image should now be straight. If it isn't, move to the next option - manual straightening.

3. Manual Straighten
If all else has failed, your final option is to do a manual straightening:
Use the keyboard shortcut (R) or click the Crop & Straighten tool option with your mouse to open the Crop & Straighten toolbox.
You will need to activate the straight tool by placing your mouse outside of the crop selection box (the box with the grid lines).
Now just click and drag your mouse up or down beside the image to straighten it. You can use the grid lines to guide you.
Finish
Ideally, you should ensure you take a straight picture. That's not always possible. That's where Lightroom can come in, as we've shown above. Good luck straightening your images in post-processing. The more you practice, the easier it will become.