20 Important Lightroom Shortcuts To Speed Up Workflow
It’s not unusual to hear of a photographer complain that they’re spending more time in the post-production process than shooting pictures. It’s very telling. They’re not likely making use of software like Lightroom, or they haven’t learned how to maximize its potential to save them precious time.
For any professional photographer, time is money. Utilizing shortcuts or presets in Lightroom or any photo editing software is crucial to time saving. Below are some tips for you on how you can use Lightroom’s potential to simplify your post-production time and save you some precious time.
1. MODULE NAVIGATION:
Rather than having to navigate to the top of your page each time to click, you can click Ctrl + Alt (Windows) or Cmd + Option (Mac) plus the number of the module you want. (Modules are numbered one through seven.) In Lightroom, likely spending most of your time in either Develop or Library modules. To move quickly and easily between Develop and Library modules hit G for Grid and D for Develop. You can also turn off module names for one you don’t use by selecting the module’s name, right clicking, and be marking the ones you don’t want to see.
2. AUTOADVANCE:
Cut down on time you spend rating your photos withW the Caps Lock Auto Advance. Go toLibrary and click on the Caps Lock key to turn it on Photo -> Auto Advance. After you rate a photo, it will advance automatically to next photo for you. Another trick: use your number keys to rate your photos (one - five for stars, six - nine for color, P & X for flags). With some practice, you’ll get how to quickly use this system; it's saving a lot of time.
3. VIEW FULL SCREEN:
To see your image in full screen at any time, press the F key.
4. LIGHTS OUT MODE:
To see your image only without having it fill your screen, Lights Out Mode is the way. Press the L key, and you will remove distractions by graying them out. Press it twice, and you black out the screen. Take it click three times to return.
5. HIDE PANELS:
Some of us are easily distracted, and hiding panels can make it easier for you to stay on task especially if you’re deciding between images in Survey Mode. To hide panels, click Shift + Tab, and all panels will disappear. You can now just focus on the image on your screen.
6. SURVEY MODE:
Try using Survey Mode to cull images in a more efficient manner to allow you to compare them. You can pick the pictures to compare, then hit N. You’ll instantly see the chosen images simultaneously to compare them. As you scroll your mouse across a picture while in Survey Mode, you will see an “X” at bottom right-hand. Click the “X” to eliminate an image you don’t like. It simplifies the culling process to leave you with the ones you most like. It’s especially useful when you have numerous versions of the same image!
7. COPY & PASTE:
Sometimes a group of photos will need the same adjustments made to that entire group. Rather than doing each one individually, you can just adjust or edit one, then easily apply those changes to the rest of the group. Try copying the develop settings and pasting onto your remaining photos of the group. Just select your first photo and then Shift + Cmd + C (Mac) or Shift + Ctrl + C (Windows). A pop-up will ask you which changes you’d like to copy. You should be able just to click on Copy. Then you simply click on the photo you’d like to apply these settings to by clicking on Shift + Cmd + V Mac or Shift + Ctrl + V on Windows. You’ve just pasted the settings onto that photo and can repeat. To reset the adjustments you’ve made: Shift + Cmd + R on Mac or Shift + Ctrl + R on Windows. To reset the changes, use Shift + Cmd + R (Mac) or Shift + Ctrl + R (Windows). You can also make these adjustments into its own Preset if you think you’ll be going back to them repeatedly. To do this, click the + button in your Presets panel (or Cmd + Shift + B on Mac or Ctrl + Shift + B in windows). You now have a preset you can return to in your User Presets folder found in your Presets panel.
8. SOLO MODE:
Although Lightroom helps with its practical workflow features, there are many settings to wade through at times taking its toll on your day. The Solo Mode, however, is meant to simplify things and make them more user-friendly. If you are in Solo Mode, when you click on another panel, it automatically collapses the previous panel to simplify your screen visually. Turn it on Mode, you can hold down Alt on Windows or Option on Mac and click on the header. Also, right-click on any panel to select Solo Mode.
9. COLLECTION:
Photographers often move their best or favorite images into a separate folder for better organization and easier access. Lightroom's Collections allows you to do the same thing except it doesn’t move them. It only creates another reference to them separately. You can create or view them within either Develop or Library modules. There are two ways to create a collection: 1) drag them individually into a folder; 2) Right click on a folder to work with; choose “Set as Target Collection”; press B as you view your images to add to the collection folder. You’ll need to reset the Target Collection, though, for different shoots.
10. BRUSH & ERASER:
Photographers often find themselves using Adjustment Brush to make specific changes or small corrections. It’s another one of Lightroom’s nifty tools, but you can find yourself spending too much time between the Adjustment Brush and the Eraser. Try this quick shortcut: Option in oMac or Alt on Windows. It lets you go between tools without needing to leave the photo saving some time.
11. RESET SLIDERS:
To quickly reset all sliders you’ve previously used, double-click on Effect in the upper-left corner of your toolbox. This quickly resets your sliders allowing you to make adjustments. You also can click on a slider's title to reset it back to zero.
12. PHOTO MERGES:
It used to be that creating panoramas or HDRs by merging images was a cumbersome process at best. It’s now easier than ever in Lightroom using photo merge. Select images you want to merge and select HDR or panorama. A preview window pop-ups and you can select fro several options before you make finalize your merge.
13. PINS:
Lightroom drops pins on your image wherever you’ve made changes using a tool. While that’s helpful, as you begin to make a lot of changes, the pins can be distracting. Press the H key to concealing the pins.
14. PAINT OVERLAY:
You can use this shortcut when using adjustment brushes or gradient filters to see what is are being affected. Press the O key to click on the painted overlay (shown in red). You can then fine-tune your adjustments while knowing what you’ve already done or been. Click O again to toggle the overlay off.
15. ROTATE A CROP:
Use R key to quickly open up your crop tools. You can then rotate your crop by clicking your X key. This is particularly useful when changing the landscape orientation of an image. You’ll be able to look between the orientations to decide which works best.
16. STRAIGHTEN TOOL:
The Straighten Tool is particularly nifty when you’re trying to crop and straighten things out. You can even do this across several photos using a shortcut. Press R to get you to Crop Mode then hold down the Control on Windows or Command on Mac. The Straighten Tool appears, and you can then draw a line for an easy and automatic crop happen.
17. SHOW CLIPPING:
There are a few ways you can view clipped parts of the picture if you’re in Develop mode. Look at the upper parts of the corners of the histogram where you’ll see two small triangles. If you click on the left triangle, you’ll see the black clipped part. If you click on the right one, the white clipped areas show up. You can skip the clicking on triangles by pressing your J key.
18. ZOOM IN & OUT:
If you want to get a closer look, you can zoom in or out? Click on any part of the image to zoom in 100%. For more, use Ctrl + on Windows or Cmd + on Mac. When you’re ready to Zoom out: Ctrl - on Windows or Cmd - on Mac.
19. CROP TOOL
When using the crop tool, press X to switch the crop between horizontal and landscape modes.
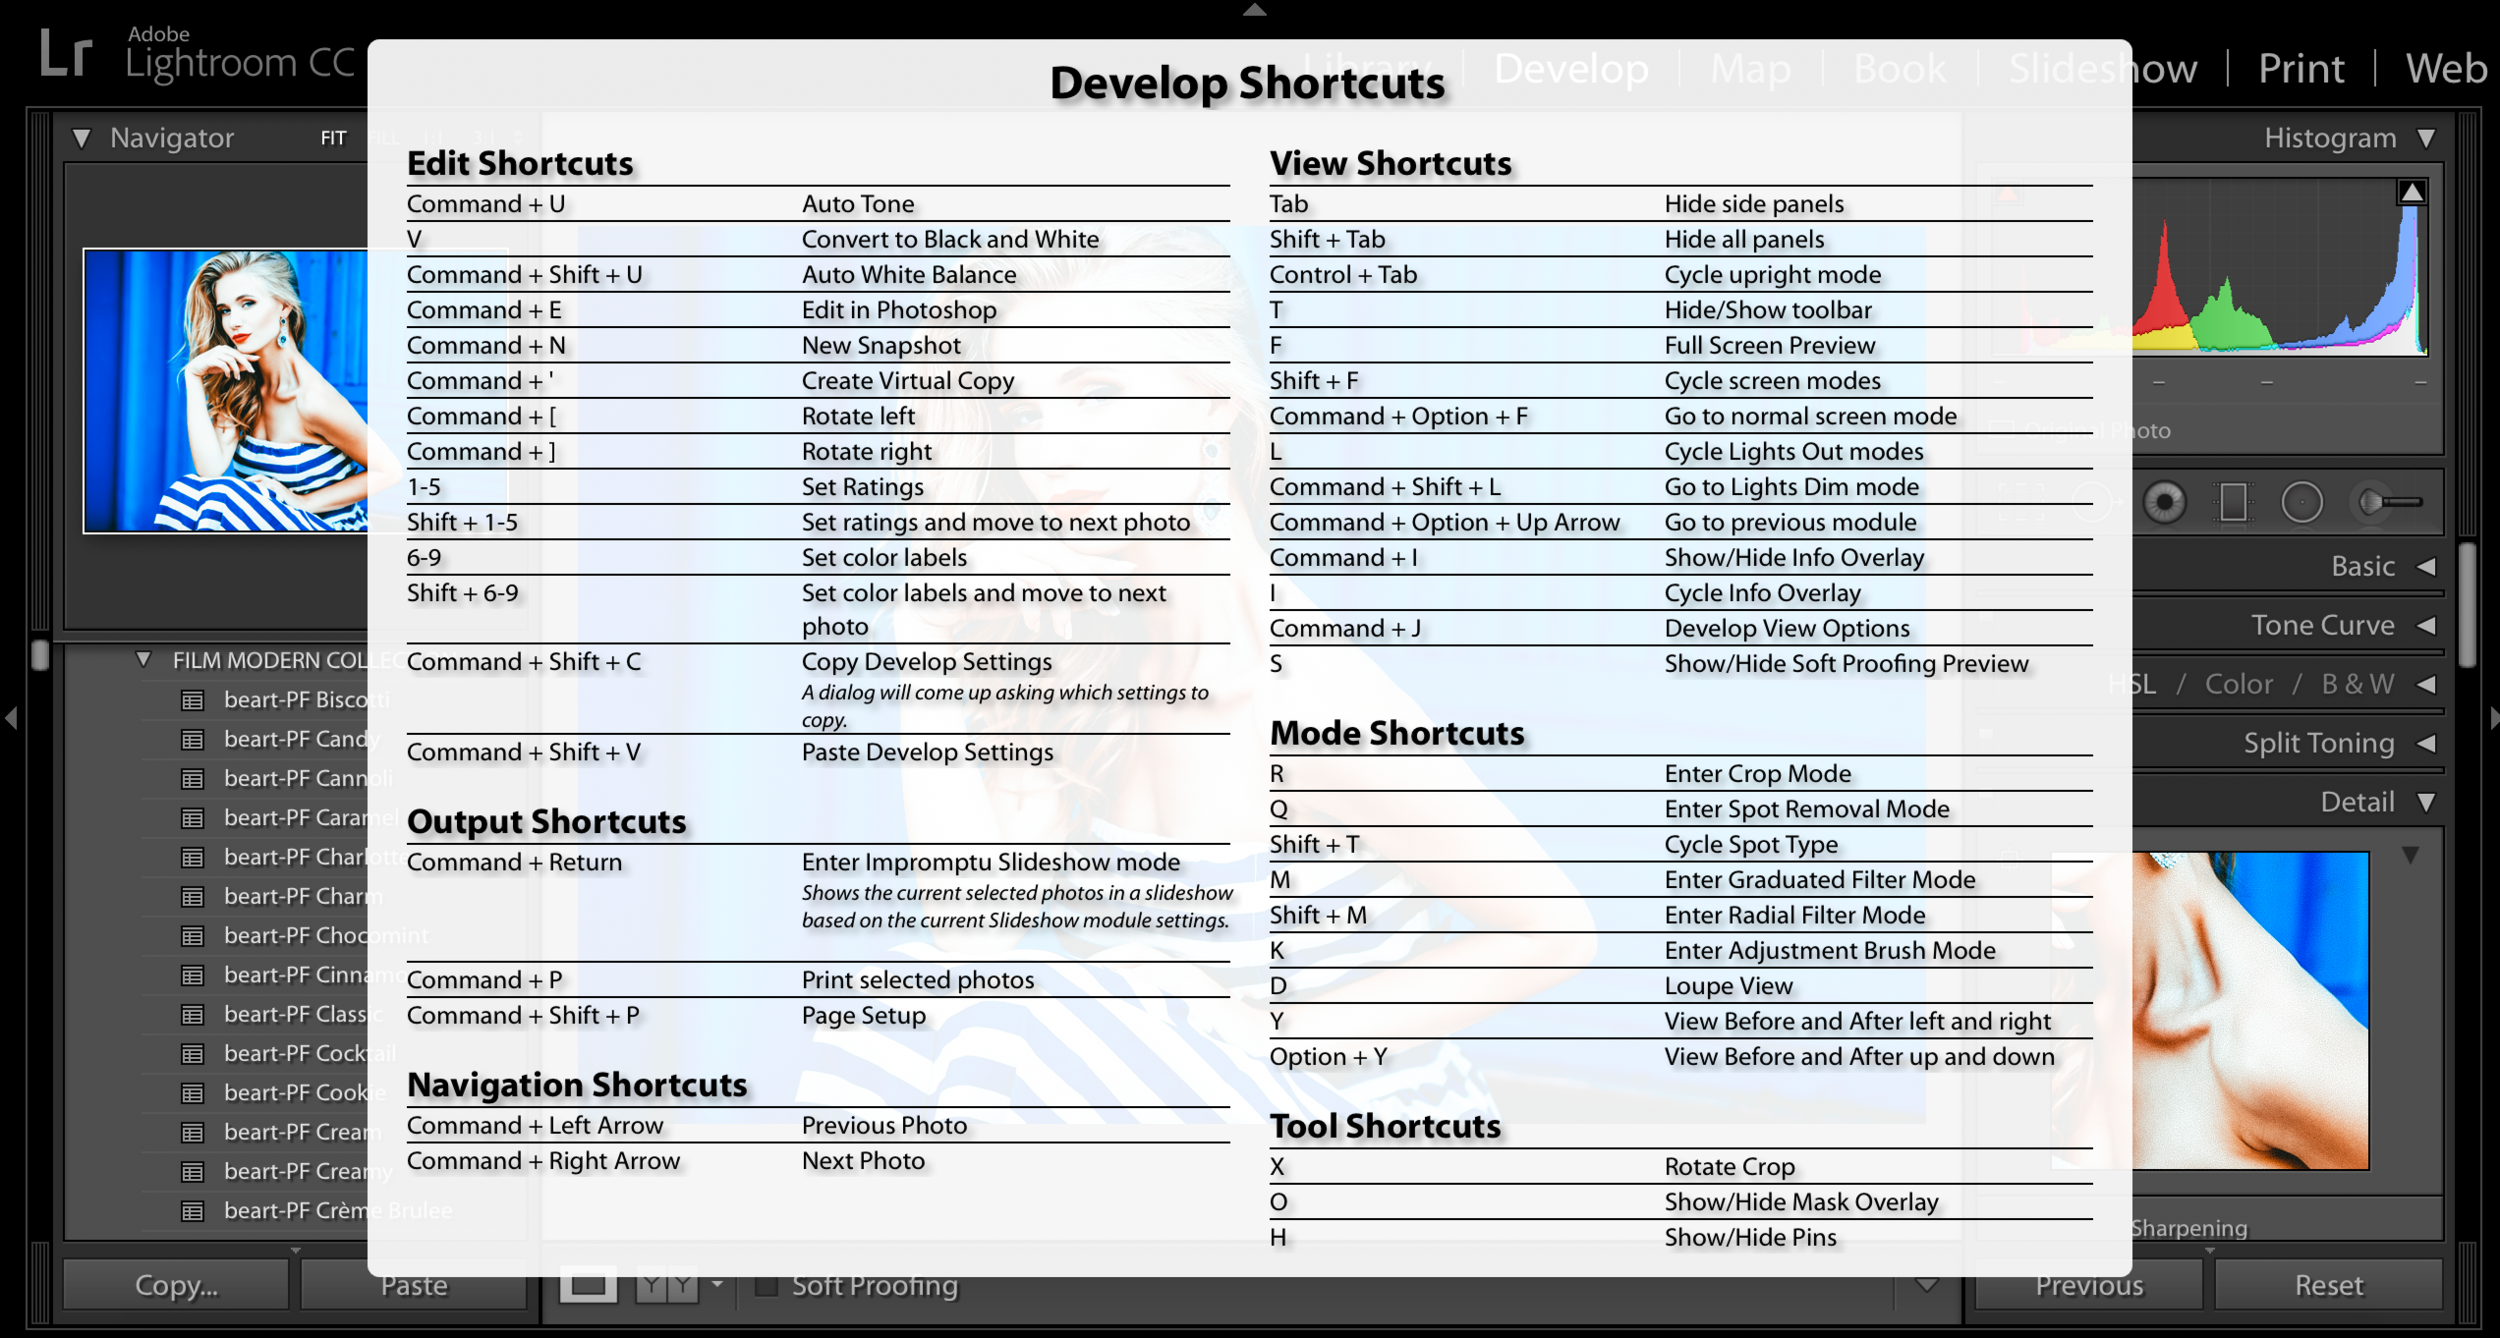
20. SHORTCUTS IN LIGHTROOM
A for a list of module shortcuts press Ctrl + / in Windows or Cmd + / on Mac
These shortcuts might seem overwhelming to remember, but you can memorize them as you use them more and more. Practice makes perfect when it comes to great photography, and it’s no different in post-production!
We would absolutely love for you to follow us on FACEBOOK and be a part of our community. Don't forget to Share your photos with us using hashtag #BeArtPresets